Skip to content
Agentic Workflowdocs
v0.8.2Install free

use the app / workflows

Create a Workflow

Learn how to build workflows in AWFlow — from opening the app to saving and running automations.

A workflow is a set of steps (nodes) connected together.

Each step does one thing, like:

  • Get text from the page
  • Click a button
  • Fill a form field
  • Clean or format the data
  • Send the result somewhere

  1. Click the AWFlow icon in your browser.
  2. Click Add Workflow. This opens a single wizard with three steps:
    1. Source — choose how you want to start: Template (browse a curated gallery of ready-made templates), Blank (start empty, triggered or lambda), Marketplace (browse and install a community-published workflow, with its permissions shown before you install), or Import (load a workflow from a .awf file or a URL).
    2. Choose — pick the specific template, marketplace listing, or file/URL for the source you selected (skipped for Blank).
    3. Details — name your workflow, add an optional description, and pick where it’s saved (this defaults to your storage preference; anonymous users save to Local).
  3. Click Create, then Add first step… on the canvas.
  4. Search for a node you want (for example Get Selected Text) and add it.
  5. Click the node to open its settings and choose the options you want.
  6. Add more nodes and connect them.
  7. To test, open the page you want to automate, then click Execute Workflow.
  8. Click each node to see its output.
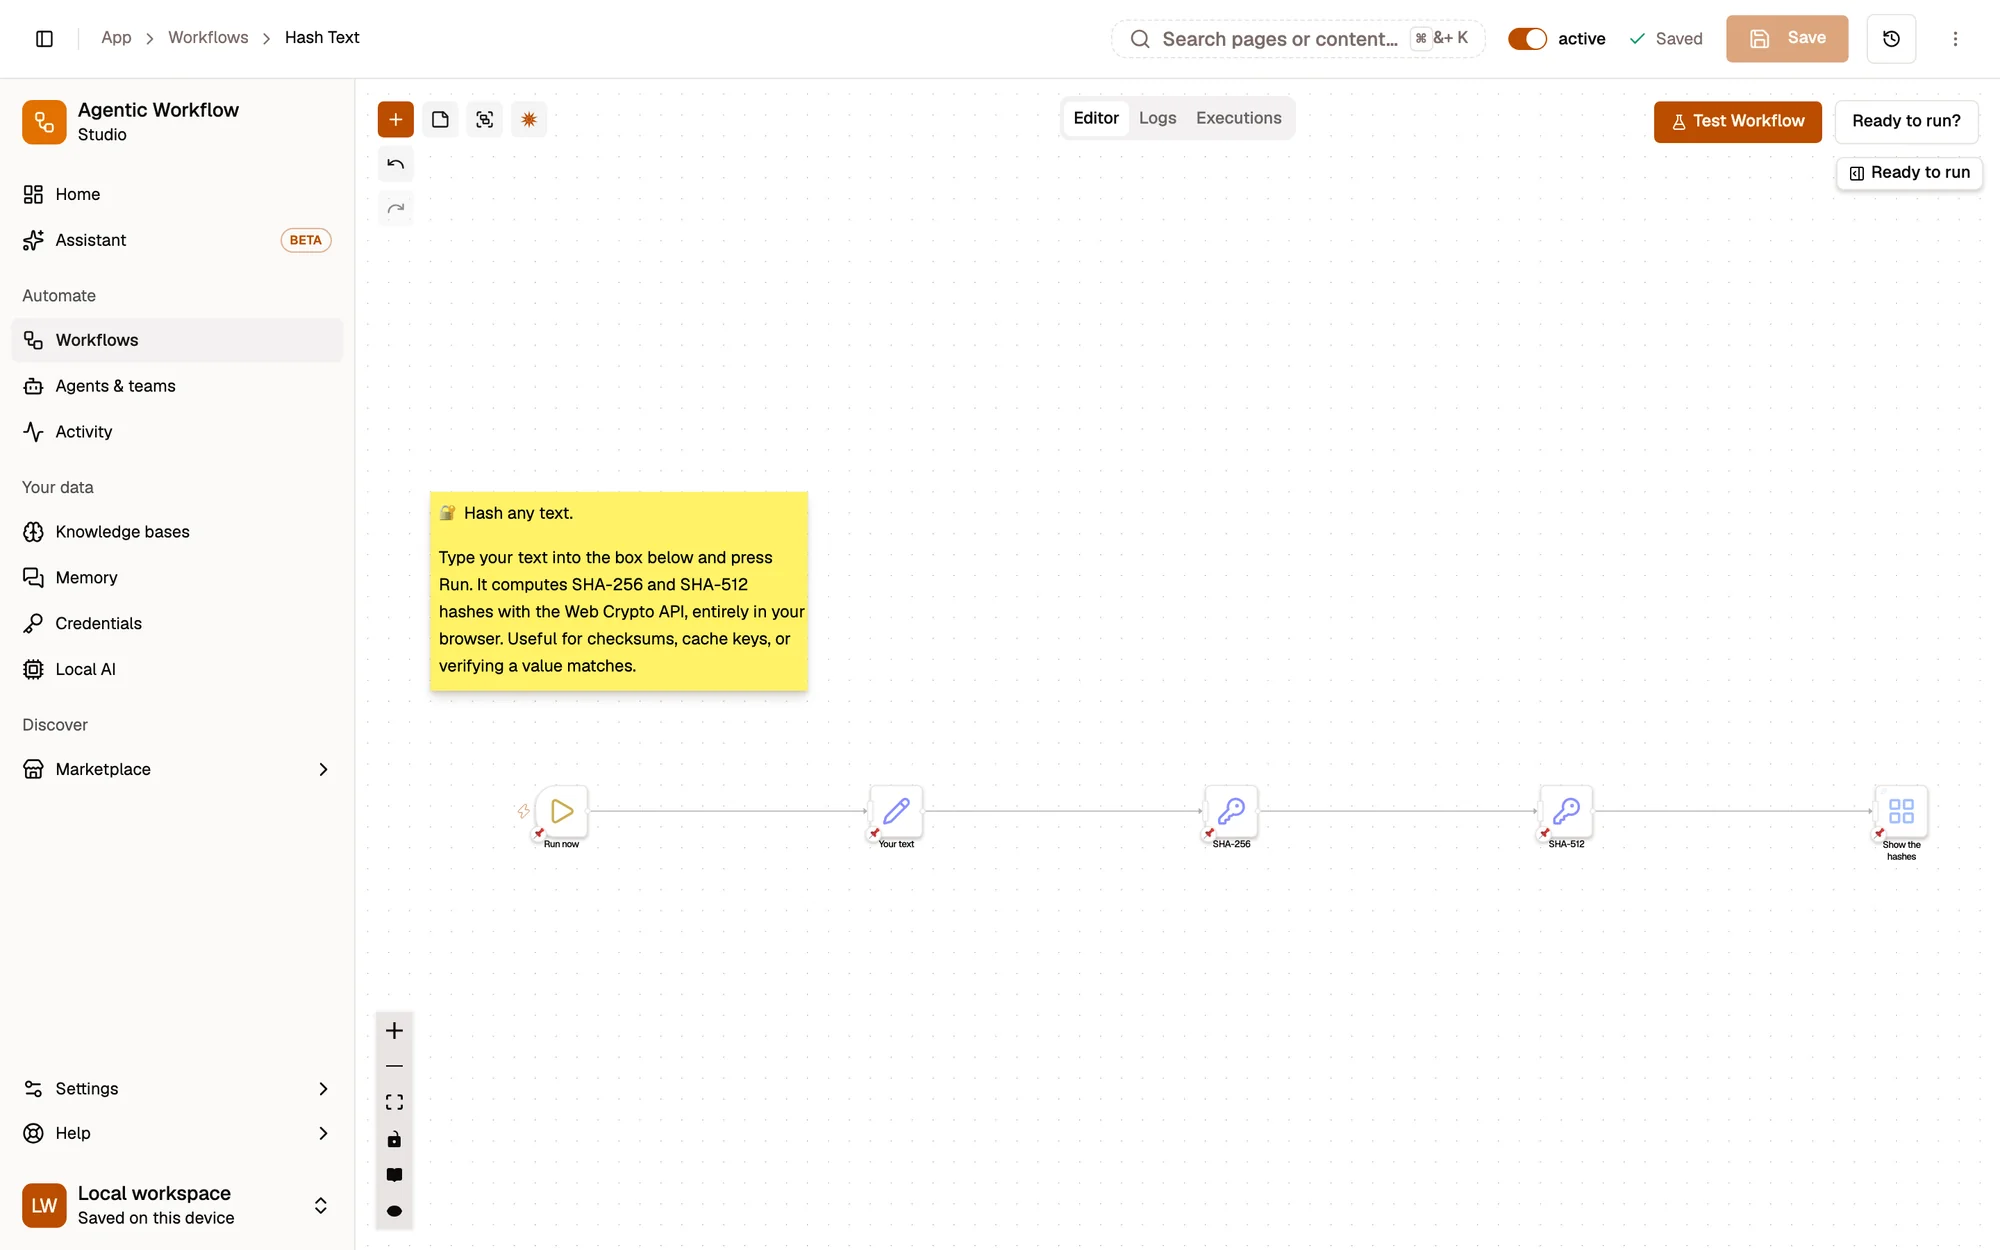
The workflow editor with the Hash Text example: a sticky note explaining it, then five connected steps (Run now, Your text, SHA-256, SHA-512, Show the hashes). The toolbar with Editor, Logs and Executions tabs is at the top, the Test Workflow button at the top right, and zoom controls at the bottom left. The workflow editor with the Hash Text example: a sticky note explaining it, then five connected steps (Run now, Your text, SHA-256, SHA-512, Show the hashes). The toolbar with Editor, Logs and Executions tabs is at the top, the Test Workflow button at the top right, and zoom controls at the bottom left.
  1. Add a step (node)
  2. Editor, Logs and Executions tabs
  3. Test Workflow: run it now
  4. A step (node); drag from its handle to connect

When you open a template (or any pre-wired workflow) for the first time, the editor shows a checklist of what’s missing before you can run it — such as a credential to connect or a required field to fill in. Fix each item from the checklist, then click Run once everything is ready.

You can automate tasks such as:

  • Extracting page content
  • Interacting with forms or elements
  • Processing data with AI
  • Branching logic or loops
  • Combining browser and external data

If you’re new, try the Quick Intro Tutorial first to experiment with basic browser nodes.


Best for testing, or when you want to decide exactly when to run:

  1. Open the page you want to automate.
  2. Open the extension and choose your workflow.
  3. Click Test Workflow.
  4. Nodes will run in order using the current page state.

After a run finishes, the Last run tab of the panel on the right shows what actually happened in plain words — not raw logs. On success, you get the real-world effect of the run (for example, “Sent to #general”) plus a link to verify it yourself. On failure, you get the plain-language cause, a few things to try, and the option to show technical details if you need them. See Run from the canvas.

One floating panel below the run buttons holds three tabs, and opens the one that matters most on its own:

  • Story — How this flow works, step by step.
  • Ready to run — what is still missing (a connection, a required field) with a button to fix each one. Ready to run? in the toolbar opens this tab; its count is the number of things left. Steps that still need setup also carry an amber dot on the canvas — hover it to see what’s missing.
  • Last run — the outcome of the last test run.

Close it with the collapse button; it shrinks to a small pill under the run buttons.

In a step’s settings, a field is checked against what the step expects as soon as you leave it — a required field left empty or a value in the wrong format shows a short message under the field. Fields that map data from earlier steps with {{ }} show Preview from last run: the value they resolved to in the last test run (run the workflow once to see it).

If your workflow starts with a trigger node, it can start on its own once the workflow is Active. Switch it on with the Active toggle in the canvas header, or with Activate in the workflow list.

Examples:

When Started is the manual trigger: it runs only when you click the run button.

Even when you use triggers, manual runs are still useful for testing.


  • Workflows run in the page you currently view, so they see real-time content and page structure.
  • Because they run inside the browser, workflows are subject to browser security rules (e.g. cross-origin constraints).
  • Very large workflows or heavy processing may hit browser performance limits (memory, CPU).
  • Workflows are saved locally in your extension — they persist across browser sessions. You can export/import workflows to share or back them up.

The status next to Save tells you where you stand: Saved, Unsaved changes, Saving…, or Couldn’t save · Retry. Changes you make while a run is in progress stay unsaved until you save.

If you try to leave the canvas with unsaved changes, you’re asked whether to Save & leave, Leave without saving or Stay. Closing or reloading the tab shows the browser’s own warning.

Shortcut Action
⌘ S / Ctrl S Save
⌘ Z / Ctrl Z Undo
⇧ ⌘ Z / Ctrl Shift Z or Ctrl Y Redo

Undo and redo don’t fire while you’re typing in a field, so they don’t fight the field’s own undo.


  • Add nodes gradually. Test often instead of building everything at once.
  • Use If / conditional nodes to manage different paths.
  • In each node, inspect results to understand what data you have.
  • Use meaningful names or notes for nodes — this helps you and others read the flow.
  • Start with small exported examples or existing workflows to learn patterns and best practices.

Quick Intro Tutorial

A simple step‑by‑step example using browser extraction and basic processing.

Go →

Learning Path

See a full roadmap from beginner to advanced workflows.

Go →

Browser Nodes Reference

Discover all supported browser interaction nodes (click, scroll, forms, etc.).

Go →

AI & Local Models

Learn how to incorporate LLMs for text processing, summarization, reasoning, and more.

Go →

Ask Aria